If you can chain and single crochet, you can make this bunny. This easy crochet bunny pattern starts as a simple flat rectangle, worked back and forth in rows. You then seam it into a tube, gather the ends, and tie off a neck to make the head. Two little ears and a fluffy tail finish it off.
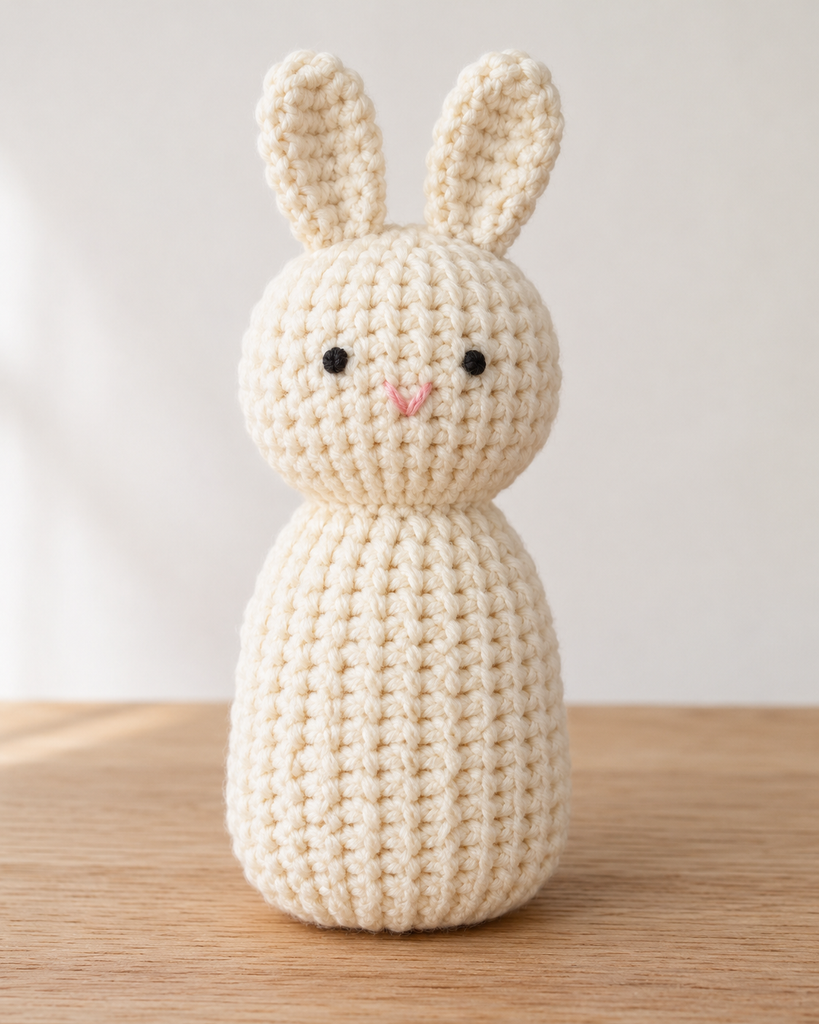
There is no shaping on the body and no counting increases in a spiral. That makes it a great first stuffed toy, a quick Easter basket gift, or a calm weekend project. Most of the work is the same row repeated, so it is easy to pick up and put down.
Table of Contents
About This Crochet Project
This bunny has four parts:
- Body and head: one rectangle of single crochet, 24 stitches wide and 40 rows long.
- Ears (make 2): small flat pieces worked in rows, with a few simple decreases to make a rounded point.
- Tail: a tiny stuffed ball worked in rounds, or a yarn pom-pom if you’d rather skip it.
- Face: embroidered with yarn, so there are no small parts to come loose.
The rectangle becomes a tube once you sew two of its edges together. The stitches run up and down the bunny, which gives it a soft ribbed look. The neck is formed by pulling a strand of yarn tight around the stuffed tube.
Skill Level
Easy beginner. You should be comfortable with:
- Making a slip knot and a chain
- Single crochet (sc) in rows, including turning
- Counting your stitches at the end of a row
You will also learn a single crochet decrease (sc2tog) for the ears, and a basic whipstitch seam. Both are explained in the Special Stitches section. The tail is worked in a small round; if rounds feel too new, use a pom-pom instead.
Materials and Supplies
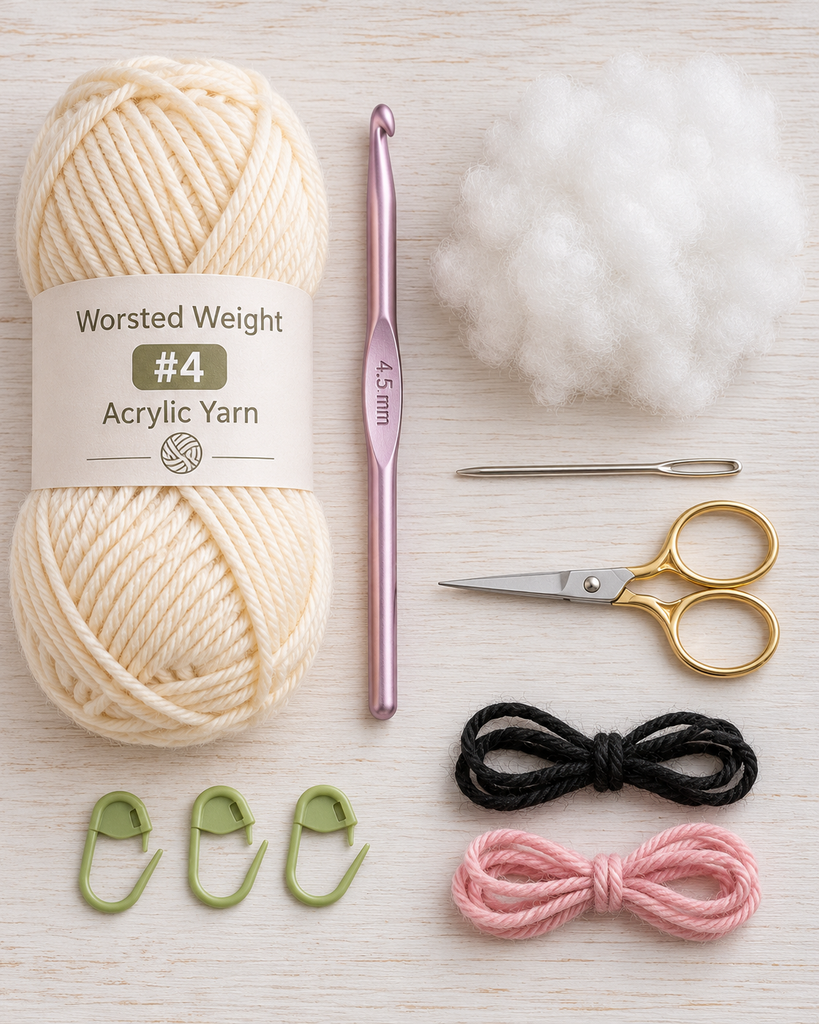
- Main yarn: worsted weight (#4) yarn in your bunny color. Estimated 60–90 yd (55–82 m) for body, ears and tail. Estimate only, not measured. One standard skein is plenty.
- Face yarn: a short length (about 1 yd) of black or dark brown for eyes, and pink for the nose. Worsted or a thinner yarn both work.
- Hook: 4.5 mm (US 7) to start; see hook notes below.
- Polyester fiberfill: a small handful. Amount not yet measured.
- Yarn needle (tapestry needle) with an eye big enough for worsted yarn
- Scissors
- Stitch markers: 2 or more (a scrap of contrast yarn works)
- Optional: a fork or pom-pom maker if you make a pom-pom tail
Recommended Yarn Weight
Use a worsted weight (#4 medium) yarn. Smooth acrylic or cotton is easiest for beginners, because you can see each stitch clearly. A light-colored yarn also makes stitches easier to count.
Avoid fuzzy, chenille or very dark yarns for your first bunny. They hide stitches and make seaming harder. You can try them once you know the pattern.
Crochet Hook Size
Start with a 4.5 mm (US 7) hook. That is about one size smaller than many worsted yarn labels suggest. A smaller hook gives a firmer, tighter fabric, so the stuffing won’t show through the stitches.
If your gauge swatch has more stitches than the target, go up to a 5.0 mm (US H-8). If it has fewer, go down to a 4.0 mm (US G-6).
Gauge and Finished Size (Provisional)
Target gauge (unverified): 16 sc and 18 rows = 4 in (10 cm) in single crochet rows.
Gauge is not critical for a toy, but it changes the size and the amount of yarn. It also matters for the fabric: if stuffing shows through, your stitches are too loose.
To check gauge, chain 21, work 20 sc per row for 20 rows, and measure the middle 4 inches.
Estimated finished size (calculated, not measured):
| Piece | Stitches × rows | Flat size at target gauge |
|---|---|---|
| Body rectangle | 24 sc × 40 rows | about 6 in × 8.9 in |
| Ear (each) | 5 sc wide × 12 rows | about 1.25 in × 2.7 in |
| Tail | 12 sc around | about 1 in across |
Once seamed, the body tube is about 6 in tall and about 4.4 in wide when pressed flat. Gathering the ends will shorten it a little. With the ears on, the bunny is estimated at 7–8 in tall. A tester must measure the real sample.
US Crochet Abbreviations
This pattern uses US crochet terms. US single crochet (sc) is the same stitch UK patterns call double crochet (dc).
| Abbreviation | Meaning |
|---|---|
| ch | chain |
| sc | single crochet |
| sc2tog | single crochet 2 stitches together (a decrease of 1 stitch) |
| st(s) | stitch(es) |
| rnd(s) | round(s) |
| rep | repeat |
| ( ) | number of stitches you should have at the end of the row or round |
| * … * | repeat the steps between asterisks as directed |
Special Stitches and Notes
Single crochet (sc): Insert hook in the stitch, yarn over and pull up a loop (2 loops on hook). Yarn over and pull through both loops.
Single crochet 2 together (sc2tog): Insert hook in the next stitch, yarn over and pull up a loop (2 loops on hook). Insert hook in the following stitch, yarn over and pull up a loop (3 loops on hook). Yarn over and pull through all 3 loops. Two stitches become one.
Magic ring (tail only): Wrap the yarn around two fingers to make a loop, insert the hook, and pull up a loop. Work your stitches into the ring, then pull the tail end to close the hole. Easier option: ch 2, then work the first round into the 2nd chain from the hook.
Whipstitch: Thread the yarn needle. Hold two edges together and bring the needle through both edges from the same side each time, so the yarn wraps over the edge like a spiral.
Pattern notes:
- Turning chain: at the start of every row, ch 1 and turn. This ch 1 does not count as a stitch. Work your first sc into the very first stitch of the row.
- Stitch counts: the number in parentheses at the end of a row is how many stitches that row should have. Count every row for the first few rows, then every 5 rows.
- Rounds (tail only): the tail is worked in a continuous spiral. Do not join or ch 1 between rounds. Place a marker in the first stitch of each round and move it up as you go.
- Leave long tails: when you fasten off the body, ears and tail, leave a yarn tail of about 12–18 in for sewing.
Step-by-Step Easy Crochet Bunny Pattern
You’ll make the pieces in this order: body rectangle, two ears, then the tail. Assembly comes last, in Finishing and Assembly.
Part 1: Body and Head (make 1)
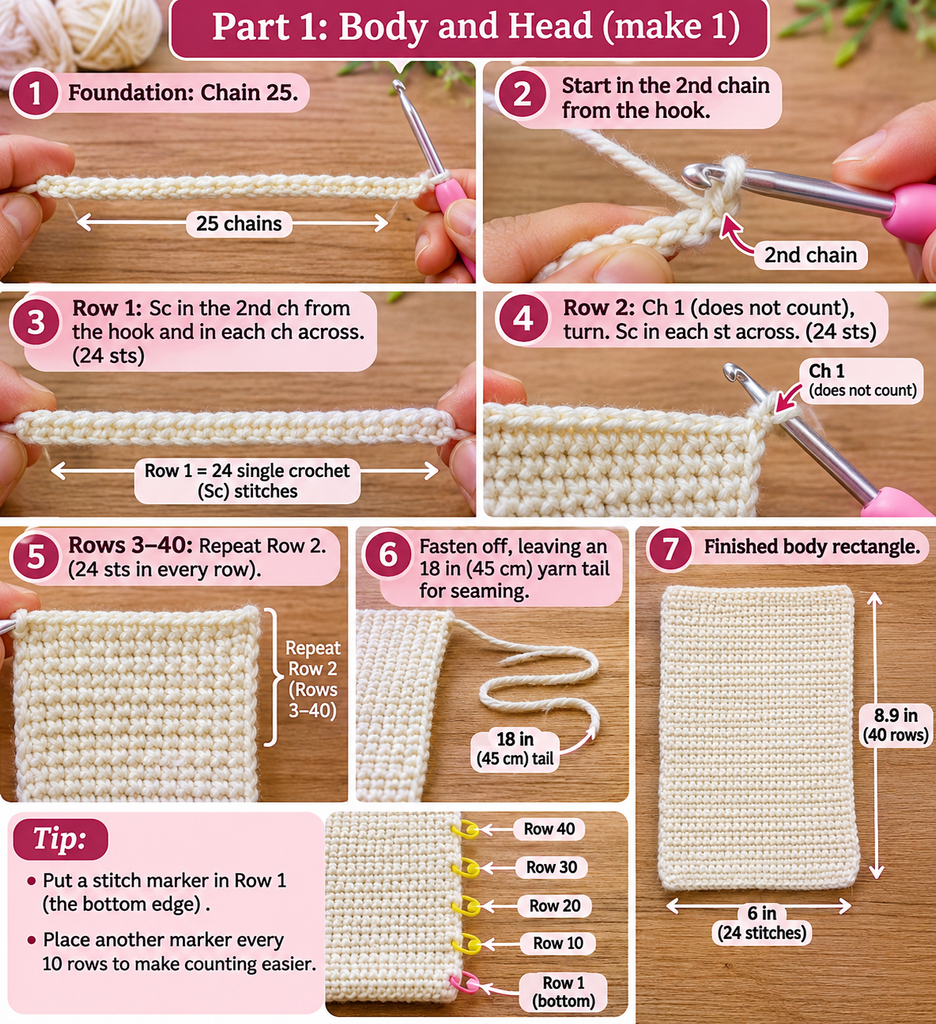
With main yarn and a 4.5 mm hook:
Foundation: Ch 25.
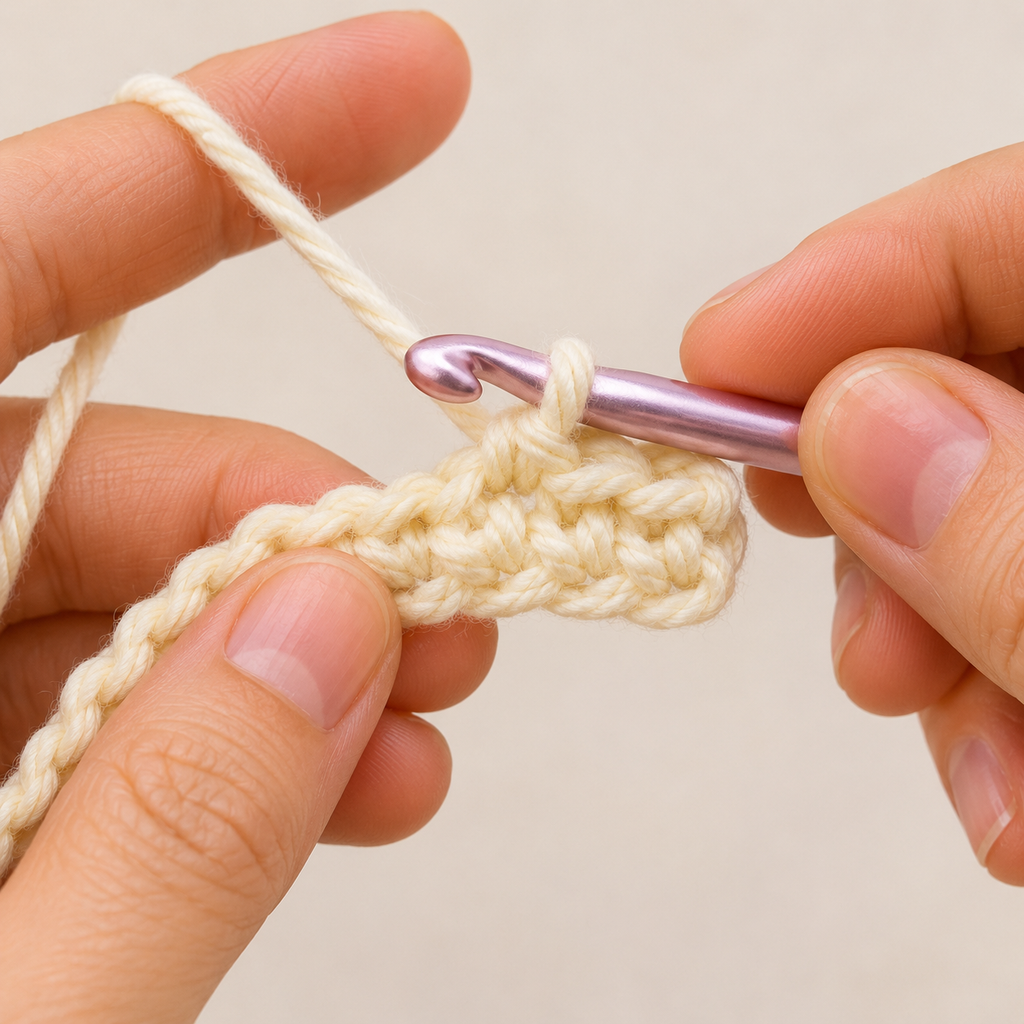
Row 1: Sc in the 2nd ch from the hook and in each ch across. (24 sts)
Row 2: Ch 1 (does not count as a st), turn. Sc in each st across. (24 sts)
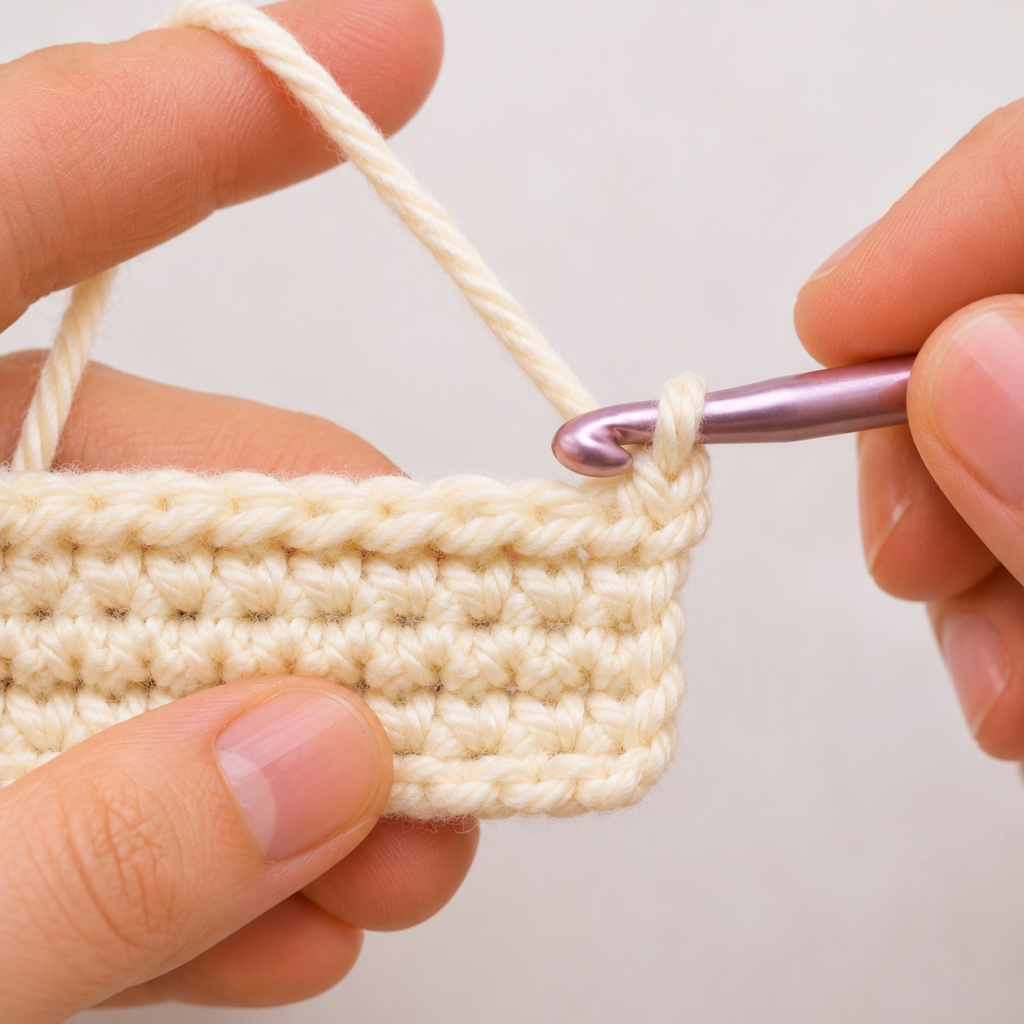
Rows 3–40: Rep Row 2. (24 sts in every row)
Fasten off, leaving an 18 in (45 cm) yarn tail for seaming.
You now have a rectangle about 6 in wide and about 8.9 in long (at target gauge). The 24-stitch edges are the foundation edge and the last-row edge. The two long sides, where the rows begin and end, are the row-end edges.
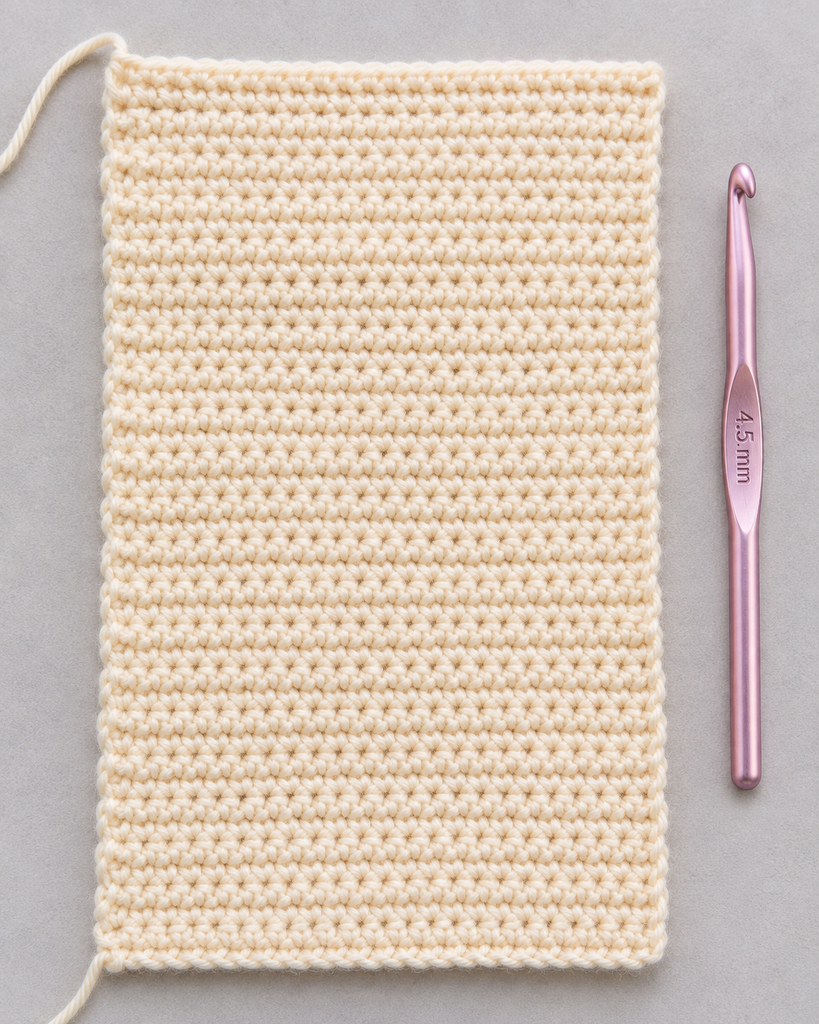
Tip: put a stitch marker in Row 1 so you always know which edge is the bottom of your work. Place another marker every 10 rows to make counting easier.
Part 2: Ears (make 2)
With main yarn:
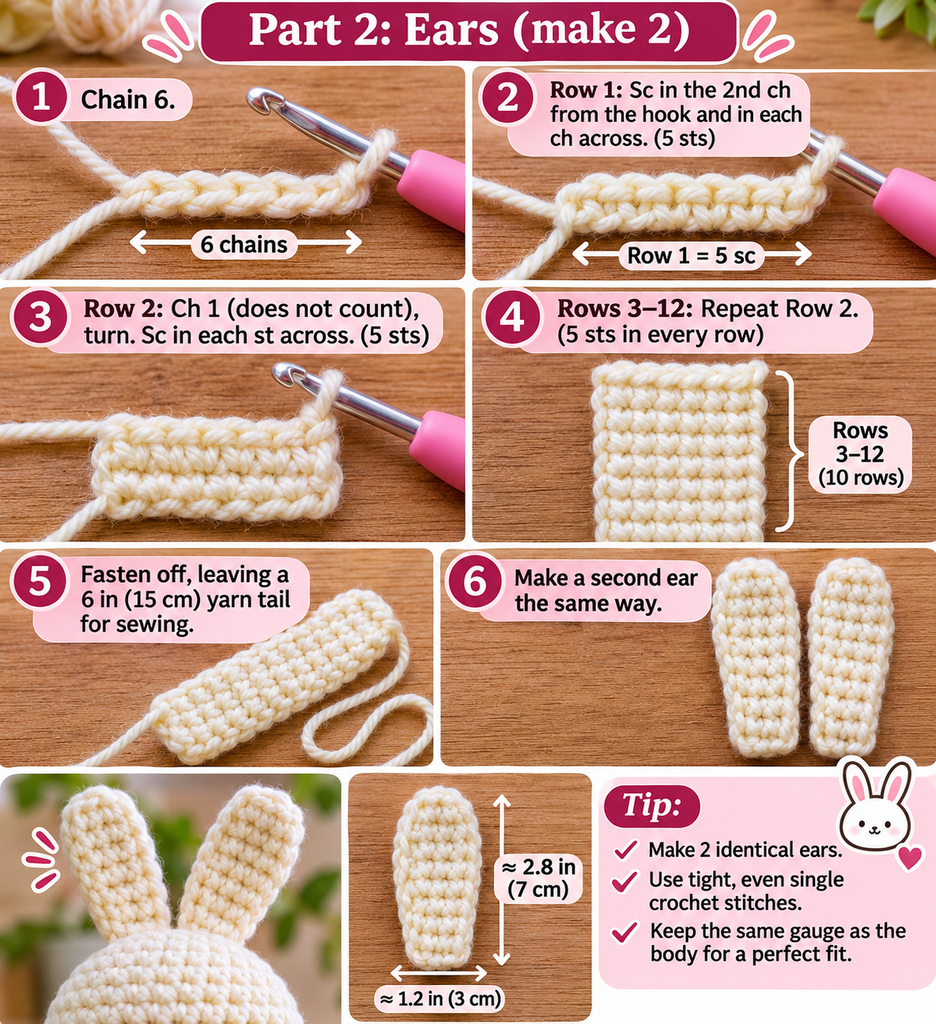
Foundation: Ch 6.
Row 1: Sc in the 2nd ch from the hook and in each ch across. (5 sts)
Rows 2–8: Ch 1, turn. Sc in each st across. (5 sts)

Row 9: Ch 1, turn. Sc2tog, sc in next st, sc2tog. (3 sts)
Row 10: Ch 1, turn. Sc in each st across. (3 sts)
Row 11: Ch 1, turn. Sc2tog, sc in last st. (2 sts)
Row 12: Ch 1, turn. Sc2tog. (1 st)
Fasten off. Weave the top yarn tail into the ear. Leave the starting yarn tail at the foundation edge long (about 12 in), or join a new length there for sewing.
The foundation edge is the bottom of the ear. The decreases make the rounded tip.
Part 3: Tail (make 1)
With main yarn, or white for a cottontail look:
Rnd 1: Make a magic ring, ch 1 (does not count as a st), and work 6 sc into the ring. Pull the ring closed. (6 sts) Or: ch 2, then work 6 sc in the 2nd ch from the hook. (6 sts)
Place a marker in the first st. Work in a spiral without joining.
Rnd 2: 2 sc in each st around. (12 sts)
Rnd 3: Sc in each st around. (12 sts)
Push a small pinch of fiberfill (or yarn scraps) inside.
Rnd 4: Sc2tog 6 times. (6 sts)
Fasten off, leaving a 12 in yarn tail. Thread it on the needle and weave it through the front loop of each of the last 6 sts. Pull tight to close.
Pom-pom option: wrap yarn about 40–50 times around two fork tines, tie tightly through the middle, cut the loops, and trim to about 1 in across. (Wrap count is an estimate.)
Stitch Counts at a Glance
| Piece | Row or round | Stitches at end |
|---|---|---|
| Body | Foundation | 25 ch |
| Body | Rows 1–40 | 24 sc each row |
| Ear | Foundation | 6 ch |
| Ear | Rows 1–8 | 5 |
| Ear | Row 9 | 3 |
| Ear | Row 10 | 3 |
| Ear | Row 11 | 2 |
| Ear | Row 12 | 1 |
| Tail | Rnd 1 | 6 |
| Tail | Rnd 2 | 12 |
| Tail | Rnd 3 | 12 |
| Tail | Rnd 4 | 6 |
Finishing and Assembly
Take your time here. Neat seams and an even neck make the biggest difference to how your bunny looks.
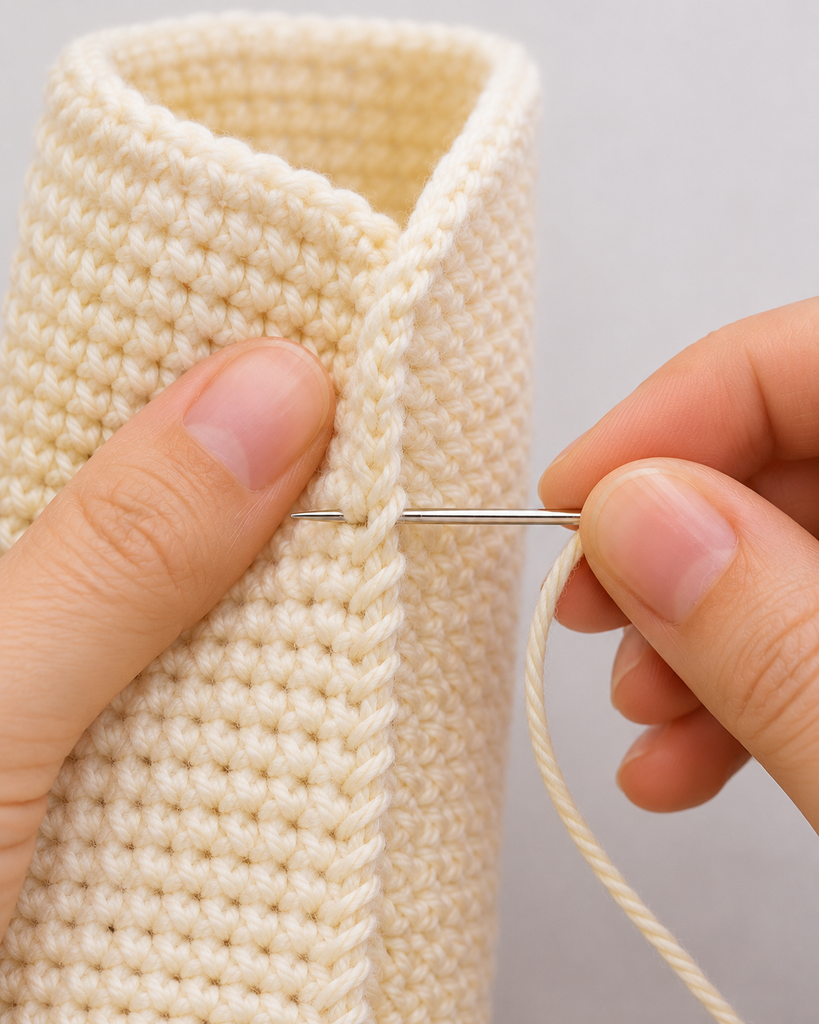
- Seam the back. Fold the body rectangle in half so the foundation edge meets the last-row edge, with the side you want on the outside facing in. Both edges have 24 stitches. Using the 18 in tail, whipstitch them together, one stitch to one stitch. Knot, but don’t cut the tail yet. Turn the tube right side out. You now have a tube about 6 in tall, open at both ends.
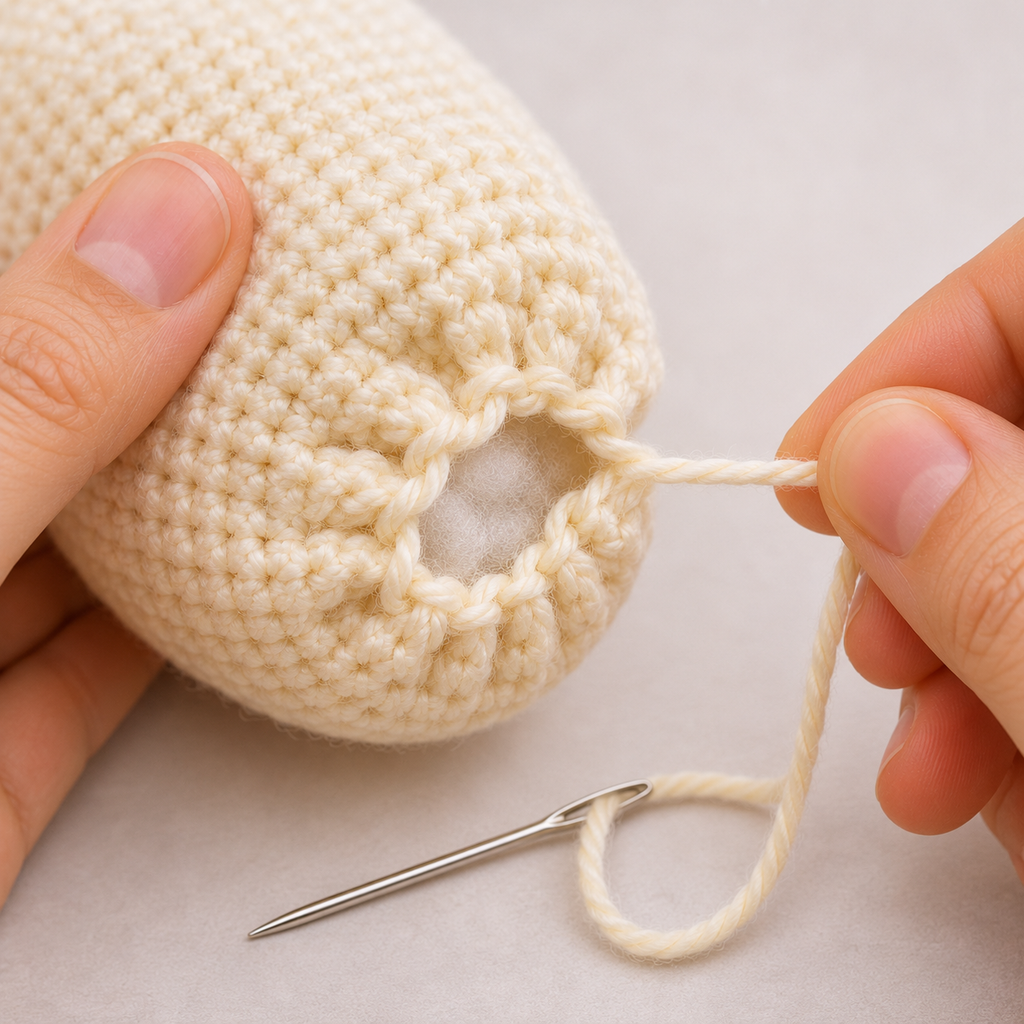
- Gather the bottom. Cut an 18 in length of main yarn and thread your needle. About ¼ in from one open end, weave the yarn in and out through the row ends all the way around (there are 40). Pull both ends tight like a drawstring, knot securely, and push the knot inside. If a small hole remains, stitch across it a few times.
- Stuff the body. Fill the tube firmly through the open top, up to about 1 in from the edge. Push stuffing into the bottom edges first so the bunny can sit. Firm but not hard is the goal.
- Gather the top. Repeat step 2 on the top opening. Add a little more stuffing right before you pull it closed, then knot and hide the knot inside.
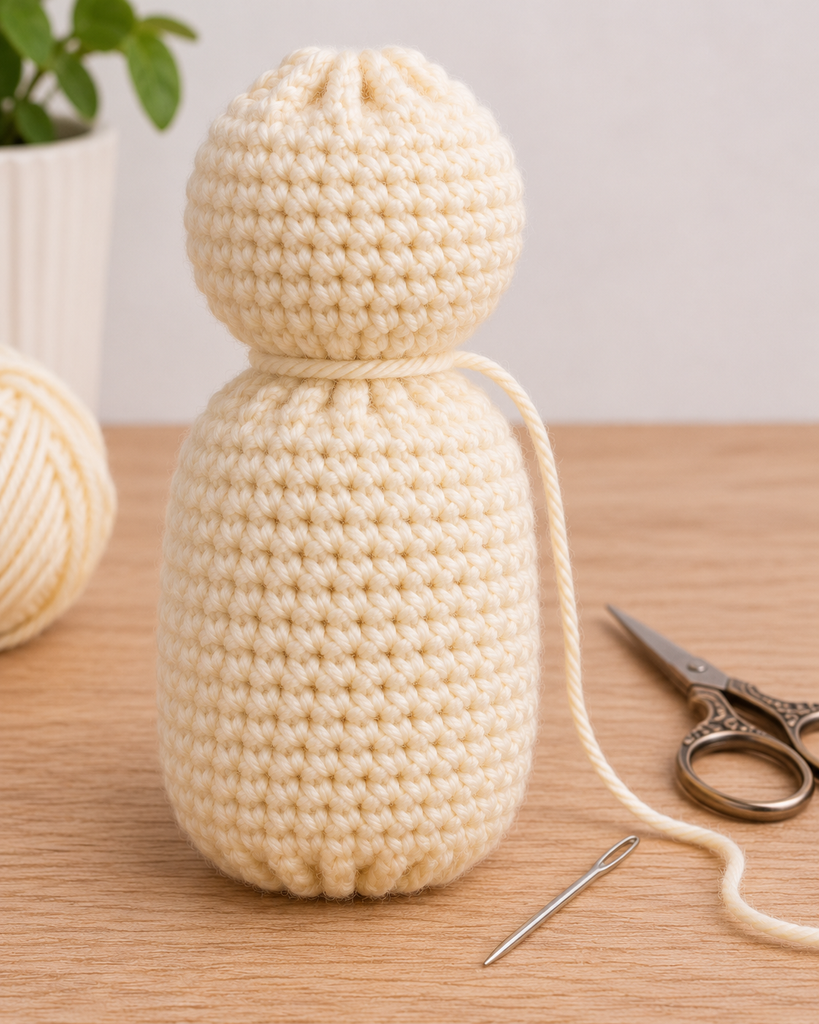
- Make the neck. Turn the bunny so the back seam is at the center back. Count about 10 stitches down from the top (about 2.5 in). Thread a 24 in strand and weave it in and out all the way around the tube along that line. Pull until the neck is as narrow as you like, then tie a double knot at the back. Push the yarn ends inside with the needle and trim. The head is now about 10 stitches tall and the body about 14.
- Attach the ears. Pinch the foundation edge of each ear slightly so it curves. Place the ears on the top of the head, about 1 in apart, one on each side of center. Whipstitch around the base of each ear twice so it stands up. Pin first and look before you sew.
- Attach the tail. Place the tail over the back seam, about 1 to 1.5 in above the bottom. Sew all the way around its base.
- Embroider the face. With black yarn, make two eyes about halfway down the head and about 1 in apart. Use a French knot or 2–3 straight stitches stacked on top of each other. With pink yarn, make a small V or Y nose just below and between the eyes. Bring the needle in and out through the neck or under an ear so the knots are hidden.
- Weave in all ends. Push each tail through the stuffed body and out the other side, then trim it close. The end will disappear inside.

Safety note for little ones: for babies and children under 3, use only embroidered features (no buttons, beads or safety eyes) and sew every piece on very securely. Always supervise young children with handmade toys.
Helpful Beginner Tips for This Easy Crochet Bunny
- Count the first three rows carefully. If Rows 1–3 each have 24 stitches, the rest of the body is just repetition.
- Watch the last stitch of each row. It is easy to skip, because it sits right beside the turning chain. Missing it is the most common reason a rectangle gets narrower.
- Keep your tension relaxed but even. Tight is fine for a toy; very loose stitches let stuffing peek through.
- Stuff in small pieces. Pulling fiberfill into walnut-sized bits gives a smoother, less lumpy shape.
- Pin before you sew. Use stitch markers or pins to try ear and tail positions, and step back to look first.
- Make it your own. Try a striped body by changing colors every few rows, or add a small bow at the neck.
Common Mistakes and Solutions
| Problem | Likely cause | Solution |
|---|---|---|
| Rectangle gets narrower or wider | Missed the last stitch, or worked into the turning chain | Count each row. The ch 1 does not count as a stitch, so never work into it |
| Edges look wavy | Tension changing between rows | Try to keep the same grip; a slightly smaller hook can help |
| Stuffing shows through | Stitches too loose | Go down a hook size and remake, or stuff a little less firmly |
| Neck is lopsided | Cinching strand not level | Pull it out and weave a new strand along one column of stitches |
| Ears flop over | Base sewn too lightly, or yarn too soft | Sew around the base twice, and pinch the base slightly before sewing |
| Bottom hole won’t close | Gathering stitch too far from the edge | Add a few stitches across the hole to close it |
Care Instructions
Care depends on your yarn. For most acrylic yarns, hand wash in cool water with mild soap, gently squeeze out water (do not wring), and lay flat to dry. Check your yarn label before washing. Machine washing is not tested for this pattern and may change the shape.
Frequently Asked Questions
Is this easy crochet bunny pattern really OK for a total beginner?
Yes, if you can chain and single crochet. The body is one repeated row. The ears add one easy decrease, and the tail can be a pom-pom.
Do I need to know how to make a magic ring?
No. The magic ring is only used for the tail, and the pattern gives a chain-2 option and a pom-pom option.
Can I use a different yarn weight?
Yes, but the size will change. Bulky yarn with a larger hook makes a bigger bunny; DK yarn with a smaller hook makes a smaller one. Use a hook small enough that the fabric is dense.
How long does it take?
Time has not been tested. It depends on your speed, and many beginners finish over a couple of sessions.
Is it safe for a baby?
Use embroidered eyes and nose only, and sew all pieces very securely. See the safety note in Finishing and Assembly.
Does the turning chain count as a stitch?
No. Ch 1 and turn at the start of each row, then work the first sc into the first stitch
Conclusion
This easy crochet bunny pattern turns one simple rectangle into a soft, huggable friend. Once you’ve made one, you’ll know the whole method, and you can play with colors, stripes and sizes. Make a few for Easter baskets, baby gifts, or just for fun. If you make one, we’d love to see it!