Walk into any craft store and the crochet aisle can feel like a lot. Hooks in a dozen materials, gadgets you’ve never heard of, and kits promising everything you’ll ever need.
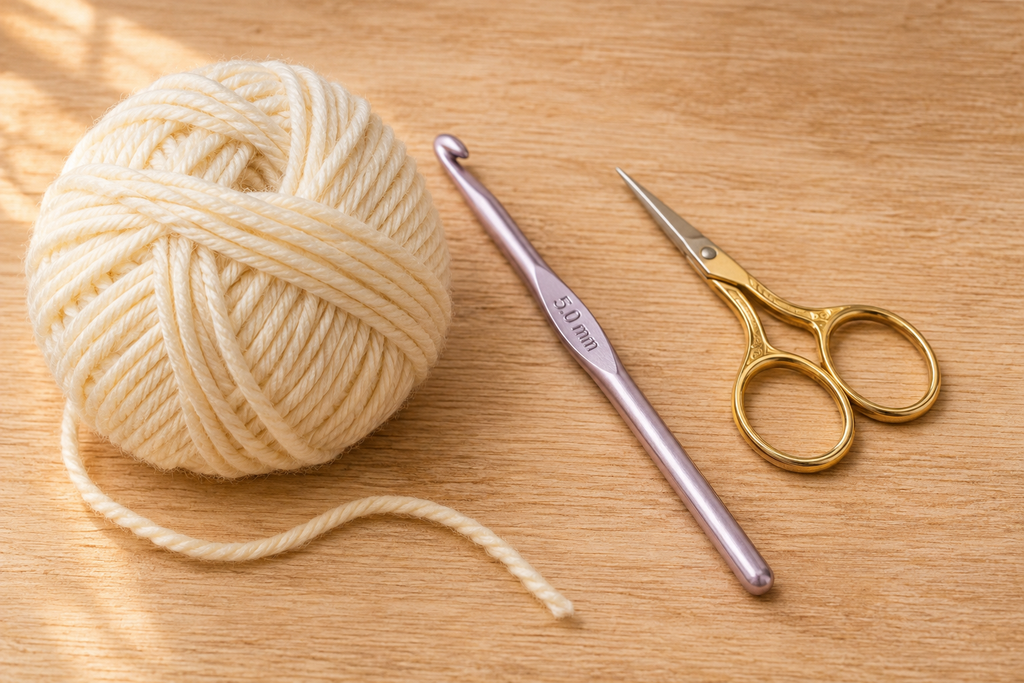
Here’s the good news: you need far less than you think. You can start crocheting with one hook, one ball of yarn, and a pair of scissors.

This guide covers the essential crochet tools for beginners, the few extras that make learning noticeably easier, and the items you can skip until later. You’ll also learn how to read hook sizes, choose a hook that feels good in your hand, and avoid the most common beginner shopping mistakes. Let’s build a starter kit that’s simple, affordable, and actually useful.
Table of Contents
Quick Answer: What Do You Need to Start Crocheting?
The true essentials (3 items):
- A crochet hook: a 5.0 mm (H-8) or 5.5 mm (I-9) is a great first choice
- Smooth, light-colored medium weight (#4) yarn
- Small, sharp scissors
Very helpful extras (inexpensive): 4. A yarn needle (also called a tapestry needle) 5. Stitch markers 6. A flexible measuring tape
Nice to have later: row counter, project bag, a full hook set, blocking mats and pins.
The 3 Truly Essential Crochet Tools
1. A Crochet Hook
The hook is the only tool that’s specific to crochet. It has a few parts worth knowing:
- Head (or tip): The pointed end that goes into your stitches.
- Throat: The groove that catches the yarn.
- Shaft: The part that sets your stitch size. Your loops sit here.
- Thumb rest (grip): The flat area where your thumb and finger hold the hook.
- Handle: The rest of the hook, which rests in your hand.
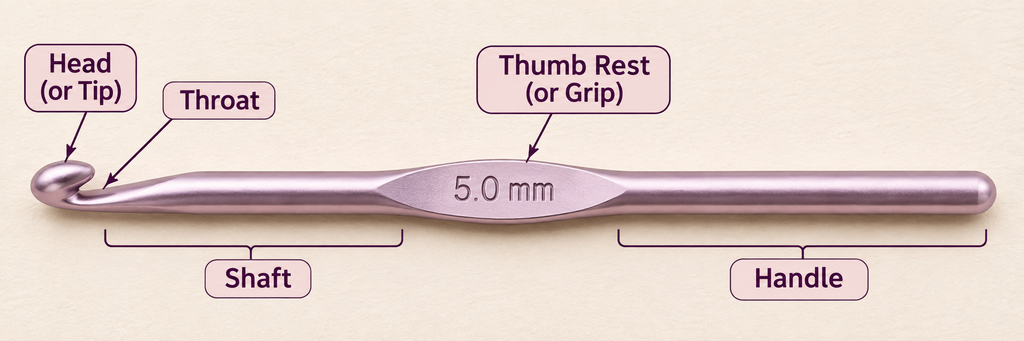
The shaft diameter decides the hook size, and that size is printed on the thumb rest.
2. Yarn
Technically yarn is a material rather than a tool, but you can’t practice without it. For learning, choose:
- Medium weight (#4) yarn, often labeled “worsted” or “aran”
- A smooth, plied yarn, not fuzzy, bumpy, or loosely twisted
- A light, solid color so you can see each stitch clearly
Dark colors, chunky novelty yarns, and fluffy textures hide your stitches, which makes it much harder to know where to put your hook next.
For a full breakdown of fibers and weights, see our guide on How to Choose the Best Yarn for Crochet (internal link suggestion below).
3. Scissors
Any small, sharp scissors will work. Small embroidery or craft snips are handy because they fit in a project bag and give a clean cut close to your work.
A clean cut matters more than you’d expect. Dull scissors can fray the yarn end, which makes weaving it in harder.
How to Choose Your First Crochet Hook
The hook is where most beginners get stuck, so it gets its own section.
Understanding Crochet Hook Sizes
US hooks are usually labeled two ways: with a letter and number (like H-8) and with a metric size in millimeters (like 5.0 mm).
The millimeter size is the most reliable, because letter labels can vary a little between brands. When a pattern lists a hook, check the mm size first.
Here are the sizes you’ll see most often with medium weight yarn:
| US Label | Metric Size |
|---|---|
| G-6 | 4.0 mm |
| 7 | 4.5 mm |
| H-8 | 5.0 mm |
| I-9 | 5.5 mm |
| J-10 | 6.0 mm |
| K-10.5 | 6.5 mm |
Tip: Your yarn label usually lists a recommended hook size. It’s a starting point, not a rule. If your stitches feel too tight to work into, go up a size. If your fabric looks loose and holey, go down a size.
The Best Crochet Hook Size for Beginners
For most beginners using medium weight yarn, a 5.0 mm (H-8) or 5.5 mm (I-9) hook is a comfortable place to start.
These sizes are big enough that you can see and feel each loop, but not so big that the yarn feels hard to control. If you tend to crochet tightly (common when you’re learning), the 5.5 mm can feel a bit more forgiving.
Inline vs. Tapered Hooks
Hooks come in two main head shapes:
- Inline hooks: The head is the same width as the shaft, and the throat is cut straight in. Some crocheters find these easier for keeping stitches even.
- Tapered hooks: The head is rounder and narrows gently into the throat. Many people find these glide through stitches more smoothly.
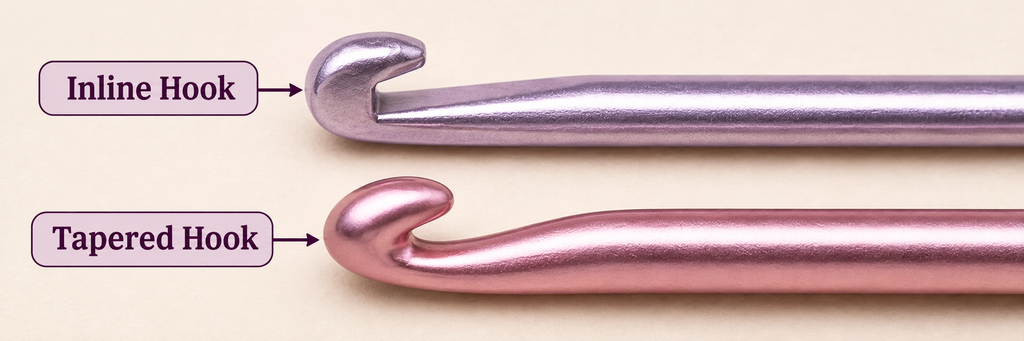
Neither is “correct.” It truly comes down to personal preference. If you’re unsure, try one of each in your chosen size and notice which feels more natural after a few rows.
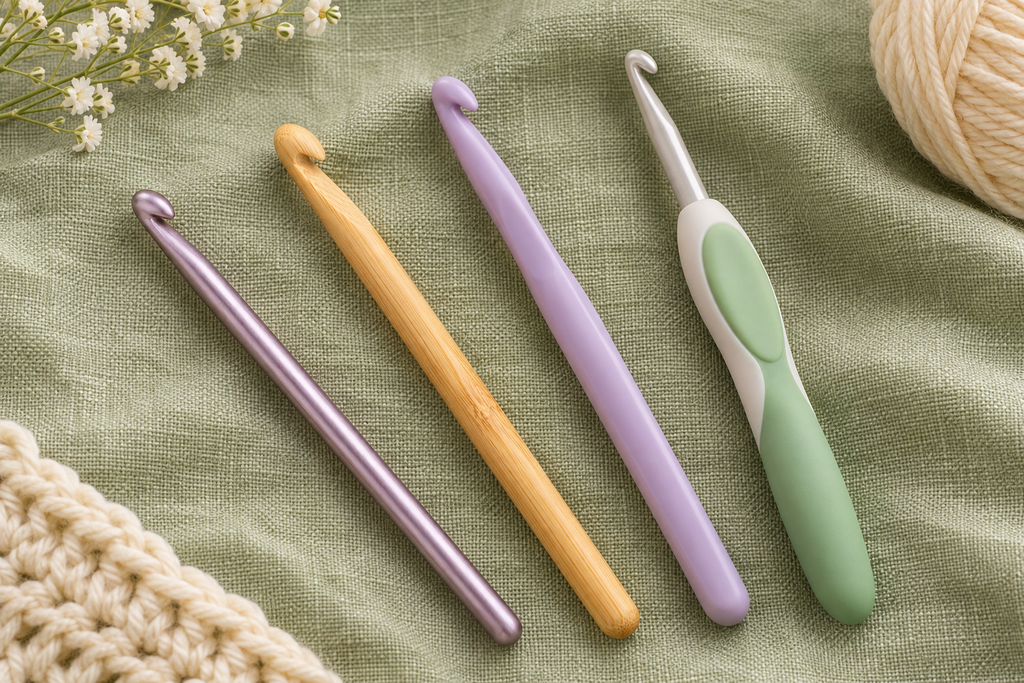
Hook Materials: Aluminum, Wood, Bamboo, and Plastic
- Aluminum: Smooth, durable, affordable, and widely available. A solid default for beginners.
- Bamboo or wood: Warm and lightweight, with a bit more grip. Helpful if slippery yarn keeps sliding off your hook.
- Plastic: Very light and often used for larger sizes. Quality varies, and smaller plastic hooks can bend.
- Steel: Used for very small sizes and thin crochet thread. You won’t need these as a beginner.
Are Ergonomic Crochet Hooks Worth It?
Ergonomic hooks have a thicker, cushioned handle, often rubber or soft plastic. The wider grip can reduce how tightly you squeeze the hook.
If your hand or wrist feels tired after a short session, an ergonomic hook is a worthwhile upgrade. If a standard hook feels fine, there’s no need to buy one right away.
A gentle reminder: Hand discomfort while learning is often caused by gripping too hard. Try loosening your hold, taking breaks, and stretching your fingers. If pain persists, check with a healthcare professional.
Helpful Extras That Make Learning Easier
These aren’t required, but each one solves a real beginner problem for very little money.
Yarn Needle (Tapestry Needle)
A yarn needle, also called a tapestry needle, is a large, blunt needle with a big eye. You’ll use it to:
- Weave in ends, meaning hiding the yarn tails inside your stitches so your project doesn’t unravel
- Sew pieces together, like joining granny squares or attaching amigurumi parts

The blunt tip slides between stitches without splitting the yarn. Metal and plastic versions both work. Some have a bent tip, which can make it easier to scoop up stitches.
Stitch Markers
A stitch marker is a small clip you attach to a stitch so you can find it again. Beginners use them to:
- Mark the first stitch of a row, which is easy to miss
- Mark the last stitch of a row, which is also easy to miss
- Mark the start of a round when working in a spiral, such as for amigurumi

Choose locking or removable markers (they open and close like a small safety pin). Closed ring markers are made for knitting and can’t be removed from crochet stitches easily.
No markers yet? A scrap of contrasting yarn or a bobby pin works in a pinch.
Flexible Measuring Tape
A soft measuring tape helps you check:
- Gauge, which is the number of stitches and rows in a set measurement (often 4 inches). Gauge determines whether your finished project comes out the right size.
- Project size, such as the length of a scarf or the width of a blanket
For practice swatches and dishcloths, gauge isn’t critical. For anything that needs to fit, like hats or sweaters, it becomes very important.
Row Counter
A row counter tracks how many rows or rounds you’ve completed. Some clip onto your hook, some sit on your table, and many crocheters simply use a free phone app or pencil tally marks.
It’s helpful, but a sheet of paper does the same job.
Nice-to-Have Tools You Can Buy Later
Once you’ve finished a few projects and know what you enjoy, these can be worthwhile:
A Full Crochet Hook Set
Sets are a good value once you’re ready to try different yarn weights. Before then, you’ll likely use only one or two sizes, so one good hook is a smarter first purchase.
Project Bag or Organizer
A simple tote keeps your yarn clean and your tools together. A zippered pouch for small items like markers and needles prevents them from disappearing into the couch.
Blocking Mats and Rust-Proof Pins
Blocking means wetting or steaming a finished piece and pinning it to shape so the stitches relax and even out. It’s especially useful for granny squares that need to match in size. You’ll want this once you start making blankets, shawls, or garments.
Yarn Bowl
A yarn bowl holds your ball and keeps it from rolling away. It’s mostly a convenience. A clean bowl or basket from your kitchen works just as well.
What to Skip When You’re Just Starting
Save money and stress by holding off on:
- Large all-in-one kits filled with tools you won’t use yet. Check what’s inside before buying.
- Tiny steel hooks and crochet thread. These are for detailed lace work and are frustrating for learning.
- Tunisian or double-ended hooks. These are for a different crochet technique.
- Fancy or novelty yarns. Save them until you can comfortably identify your stitches.
Beginner Tips for Building Your Crochet Toolkit
- Start with one hook in the right size. Buy more once you know what you like.
- Match your hook to your yarn. Check the yarn label for the suggested hook size.
- Use the mm size when shopping. It’s more consistent than the letter.
- Keep small tools in one pouch. Markers and yarn needles are easy to lose.
- Practice on a dishcloth or a simple square. It’s a low-pressure way to test your new tools.
- Hold the hook gently. A relaxed grip is easier on your hands and gives you more even stitches.
Common Beginner Mistakes and How to Avoid Them
Choosing a Hook That’s Too Small
Small hooks with medium yarn create tight, stiff stitches that are hard to work into.
Fix: Try going up half or one full size (for example, from 5.0 mm to 5.5 mm).
Starting With Dark or Fuzzy Yarn
You can’t learn to read your stitches if you can’t see them.
Fix: Use a smooth, light-colored #4 yarn until you’re comfortable.
Skipping Stitch Markers
Missing the first or last stitch of a row is the most common reason beginner projects grow or shrink unexpectedly.
Fix: Place a marker in the first and last stitch of each row until counting feels natural.
Buying a Huge Kit Right Away
Large kits can include low-quality hooks, sizes you won’t use, and gadgets that add clutter.
Fix: Start small. A couple of good-quality basics will serve you better.
Cutting Yarn Tails Too Short
Short tails are hard to thread and can work loose over time.
Fix: Leave a tail of about 6 inches when you finish or change yarn, so you have plenty to weave in.
Frequently Asked Questions
What is the best crochet hook size for beginners?
For most beginners using medium weight (#4) yarn, a 5.0 mm (H-8) or 5.5 mm (I-9) hook is a comfortable starting size. Always check your yarn label for the recommended range.
Do I need a crochet kit to get started?
No. A single hook, one ball of medium weight yarn, and scissors are enough to learn the basics. A kit can be convenient, but check that the hook sizes match the yarn you plan to use.
What’s the difference between a yarn needle and a tapestry needle?
In crochet, the terms are generally used for the same tool: a large, blunt needle with a big eye that’s used to weave in ends and sew pieces together.
Are ergonomic crochet hooks better for beginners?
They’re not required, but they can be more comfortable if your hand gets tired or sore. Many crocheters start with a standard hook and switch to ergonomic hooks later.
Can I use knitting stitch markers for crochet?
Only if they open. Closed ring markers are designed to slide along knitting needles and are difficult to remove from crochet stitches. Look for locking or removable markers.
Should I buy aluminum or bamboo hooks?
Both are great. Aluminum is smooth and fast. Bamboo has a little more grip, which can help with slippery yarns. If possible, try both and see which you prefer.
Conclusion: Start Simple and Build As You Grow
You don’t need a drawer full of gadgets to begin crocheting. One comfortable hook, a ball of smooth light-colored yarn, and a pair of scissors are enough to learn your first stitches.
Add a yarn needle and a few stitch markers, and you’ll have everything you need to finish your first real project with confidence.
As your skills grow, your toolkit can grow with them. Choose new tools when a project calls for them, not because a store display says you should.
Now grab your hook, and let’s get stitching!